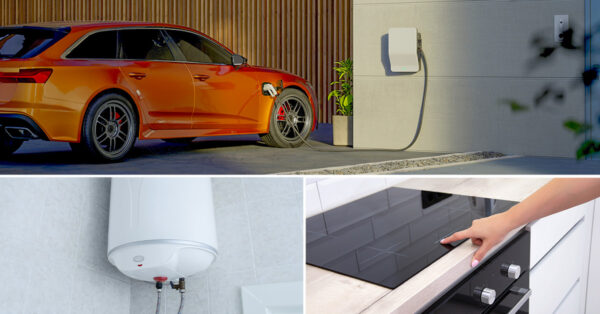
Ceiling Fan Installation Company
If your fan is wobbling, you might think it is a minor issue, but it’s not something you should ignore. When fans shake, make strange noises, or tilt while spinning, it’s time to take a closer look.
Skip to step-by-step instructions on:
- How to balance your ceiling fan WITHOUT a balancing ki (using a penny)
- How to balance your ceiling fan WITH a balancing kit
In many cases, most wobbling fan issues are caused by loose screws, misaligned blades, or uneven weight distribution. However, sometimes the issue runs deeper, especially if the fan was not installed properly, such as on an electrical box intended for a light fixture rather than a fan-rated one. That kind of setup can lead to serious safety concerns.
Even a small wobble can be a warning sign of bigger mechanical or structural problems. And when it comes to your home, safety should always come first. Fixing the wobble not only helps your fan run smoother and quieter, it also helps protect your home and your family.
Need help balancing your ceiling fan?
Call us today at (407) 646-8700 for a free quote on professional ceiling fan installation or fill out a contact form.
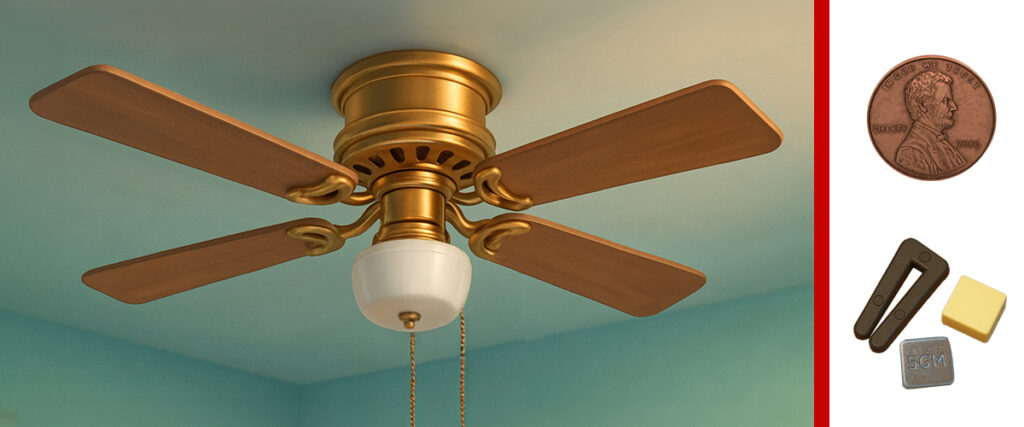
Step-by-Step Instructions to Balance a Ceiling Fan Using a Penny, Dime, or a Small Object as a Weight
If you don’t have a ceiling fan balancing kit, don’t worry; household items like pennies, dimes, or other small objects can work just as well.
These simple tools can help stabilize your fan and reduce wobbling caused by uneven blade weight.
Using this DIY method, you’ll identify the unbalanced blade, test different placements, and glue the penny to restore smooth operation.
The full step-by-step instructions are available below as a downloadable PDF.
Download PDF: Step-by-Step PDF Guide to Balance a Ceiling Fan With a Penny
How to balance a ceiling fan without a balancing kit
SKILL LEVEL: Intermediate | COMPLETION TIME: 2 hours
TOOLS AND SUPPLIES
Before you begin, gather the necessary tools. Most tools and supplies are common household items, unless you need a very tall ladder to access a ceiling fan is located on a very tall ceiling.
TOOLS
- Ladder: for safe, stable access to your ceiling fan
- Duster or a damp cloth: to clean dust and dirt from the fan blades
- Flathead screwdriver: for tightening loose screws
- Small flashlight: useful for inspecting hard-to-see parts
- Ruler, measuring tape, or yardstick: To measure the blade’s alignment
SUPPLIES
- Small weights: such as pennies, nickels, or dimes to be used as weights on the blades.
- Permanent adhesive: An appropriate glue for the ceiling fan surface, such as Superglue or permanent adhesive dots.

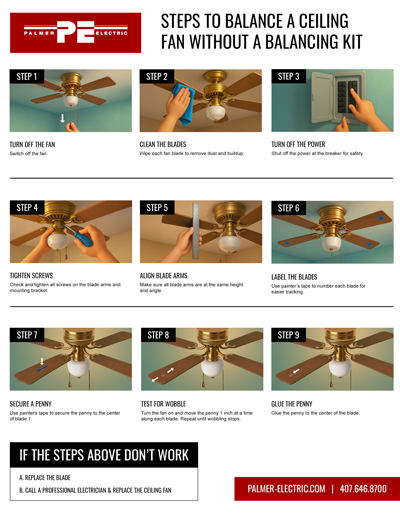
Step 1. Turn OFF The Fan
Before doing anything else, make sure the ceiling fan is completely turned off.
- Use the pull chain, wall switch, or remote control to stop the fan.
- Wait for the blades to come to a full stop before proceeding. This helps keep you safe. It also allows you to check for any wobbles before making adjustments.

Step 2. Clean The Fan Blades
- Carefully wipe down each ceiling fan blade using a damp cloth or a gentle cleaning solution to remove dust, dirt, and buildup.
- Even a small amount of accumulated debris can cause an imbalance.
- Sometimes buildup of dust on the fan is enough to throw it off balance. Regular cleaning helps prevent these issues.

Step 3. Turn Off the Power
- For your safety, turn off the power at the circuit breaker.
- This will prevent any risk of electrical shock while you work on the fan.
- Locate the correct breaker switch that controls the ceiling fan and flip it to the OFF position.

Step 4. Tighten All Screws
In this step you will check all screws in the mounting bracket, downrod, & blades.
- To Tighten the screws remove the ceiling fan cover.
- Tighten all of the following screws:
- Screws on the mounting bracket and electrical junction box.
- Screws on the downrod. Make sure all pins are firmly secured.
- Screws attaching blade holders to the motor housing. ( Blade holders are the metal or plastic “arms” that the blades attach to).
- Screws attaching the blades to the blade holders. If the blade holders themselves are bent, gently press them to adjust them up or down.
- Replace the fan canopy and tighten the screws. Tighten the screws of the lighting fixtures.
Once all screws on the ceiling fan fixture are secured, check the fan balance.
- Turn the power back ON and turn the fan ON.
- Check if the wobble is fixed.

Step 5: Check the Alignment of the Blade Arms
If the ceiling fan is still off balance, measure the blade alignment to ensure proper positioning.
- Use a tape measure to measure the distance from the ceiling to each blade.
- Mark the point on the ceiling you will use for reference with a pencil.
- Since most blades are slanted, be sure to measure the same side of each blade, from the same point on the ceiling.
- If you find one blade that is higher or lower than the rest, gently adjust the blade holder until they all match.
- Check the fan balance: Turn the power back on and turn the fan on. Check if the wobble is fixed.
If the wobbling persists, continue with step 6.

Step 6: Label The Blades
Use painter’s tape to mark each blade arm with a number. This helps you track which blade you are testing as you move the penny around.
- Turn OFF the fan.
- Use painter’s tape to number each blade arm.

Step 8: Secure A Penny
- Choose one blade to start with.
- Secure a penny to the center of one of the blades with painter’s tape.
- Make sure is positioned halfway between the blade’s base and tip.

Step 9: Test Each Blade
- Turn the fan ON at a low speed and observe any wobbling.
- If the fan still wobbles, turn it OFF and shift the penny about an inch toward the tip of the blade.
- Turn the fan ON and test again.
- Repeat this process, moving the penny in small increments, until you find the unbalanced blade and the wobble stops.

Step 10. Glue The Penny
- Once you’ve found the best position for the penny that minimizes or eliminates the wobble, replace the tape with strong glue or adhesive to permanently fix the penny in place. Make sure it’s centered and secure.
If these steps worked, congratulations! You did a great job, and now your fan is balanced. If that is not the case and the wobbling persists, please review our additional tips and troubleshooting process.
Need help balancing your ceiling fan?
Call us today at (407) 646-8700 for a free quote on professional ceiling fan installation or fill out a contact form.
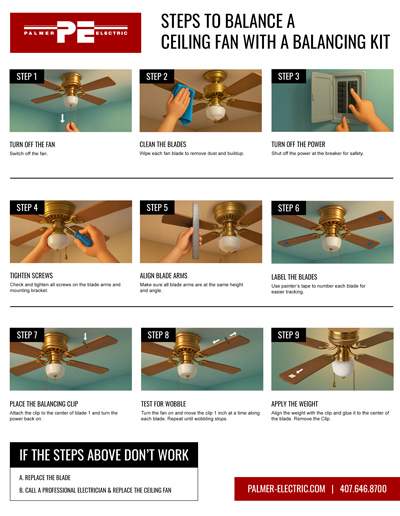
Step-by-Step Instructions to Balance a Ceiling Fan With a Balancing Kit
Step-by-Step Instructions to Balance a Ceiling Fan With a Balancing Kit
If your ceiling fan is wobbling or making noise, it’s likely out of balance.
This common issue can be corrected using a simple balancing kit. With the clip and weights provided, you can identify the unbalanced blade, test different placements, and secure the weight from the kit to restore smooth, quiet operation, without needing to replace the entire fan.
The full step-by-step instructions are available below as a downloadable PDF.
Download PDF: Step-by-Step PDF Guide to Balance a Ceiling Fan With a Balancing Kit
What is a ceiling fan balancing kit?
A ceiling fan balancing kit is a small tool set designed to correct wobbly or unbalanced ceiling fans. These kits are usually inexpensive and often come included with the fan at purchase. The primary goal is to help you identify which blade is out of balance and correct it for smoother, quieter operation.
How does a ceiling fan balancing kit work?
A ceiling fan balancing kit corrects wobbling by adding weight to the blade, causing the imbalance. The kit includes a clip and small weights. By testing each blade, you can identify the problem area and apply a weight where it minimizes movement. In homes across Orlando and Central Florida, this method is often enough to restore stability, though some cases may involve deeper mechanical or installation issues that require expert attention.
What are the benefits of using a ceiling fan balancing kit?
- Reduces Wobbling: A balancing kit helps eliminate the side-to-side motion of unbalanced blades, resulting in a smoother spin.
- Decreases Noise: Fixing the imbalance significantly reduces rattling, clicking, or humming noises caused by vibration.
- Extends Lifespan: By minimizing stress on the motor and mounting hardware, a balanced fan lasts longer and requires fewer repairs.
- Improves Performance: Balanced blades allow for better airflow, improving the fan’s ability to cool the room efficiently.
- Easy to Use: Balancing kits are user-friendly and don’t require any special tools or professional installation.
- Cost-Effective: For a few dollars or less, often included with your fan, a balancing kit can fix issues that might otherwise require costly service.
- Universal Compatibility: Most kits are universal and work with standard ceiling fans, regardless of brand or model.
How to balance a ceiling fan with a balancing kit
SKILL LEVEL: Intermediate | COMPLETION TIME: 2 hours
TOOLS AND SUPPLIES
Before you begin, gather the necessary tools & materials. These are the same items our licensed electricians use when balancing ceiling fans in the field:
TOOLS
- Ladder: for safe, stable access to your ceiling fan
- Duster or a damp cloth: to clean dust and debris from the fan blades
- Flathead screwdriver: for tightening loose blade screws
- Small flashlight: useful for inspecting hard-to-see parts
- Ruler, measuring tape, or yardstick: To measure the blade’s alignment
SUPPLIES
- Ceiling fan balancing kit (includes a plastic clip, weights, and adhesive)
- Cleaning solution
- Painter’s tape
Step 1. Turn OFF The Fan
Before doing anything else, make sure the ceiling fan is completely turned off.
- Use the pull chain, wall switch, or remote control to stop the fan.
- Wait for the blades to come to a full stop before proceeding. This helps keep you safe. It also allows you to check for any wobbles before making adjustments.
Step 2. Clean The Fan Blades
- Carefully wipe down each ceiling fan blade using a damp cloth or a gentle cleaning solution to remove dust, dirt, and buildup.
- Even a small amount of accumulated debris can cause an imbalance.
- Sometimes buildup of dust on the fan is enough to throw it off balance. Regular cleaning helps prevent these issues.
Step 3. Turn Off the Power
- For your safety, turn off the power at the circuit breaker.
- This will prevent any risk of electrical shock while you work on the fan.
- Locate the correct breaker switch that controls the ceiling fan and flip it to the OFF position.
Step 4. Tighten All Screws
In this step you will check all screws in the mounting bracket, downrod, & blades.
- To Tighten the screws remove the ceiling fan cover.
- Tighten all of the following screws:
- Screws on the mounting bracket and electrical junction box.
- Screws on the downrod. Make sure all pins are firmly secured.
- Screws attaching blade holders to the motor housing. ( Blade holders are the metal or plastic “arms” that the blades attach to).
- Screws attaching the blades to the blade holders. If the blade holders themselves are bent, gently press them to adjust them up or down.
- Replace the fan canopy and tighten the screws. Tighten the screws of the lighting fixtures.
Once all screws on the ceiling fan fixture are secured, check the fan balance.
- Turn the power back ON and turn the fan ON.
- Check if the wobble is fixed.
Step 5: Check the Alignment of the Blade Arms
If the ceiling fan is still off balance, measure the blade alignment to ensure proper positioning.
- Use a tape measure to measure the distance from the ceiling to each blade.
- Mark the point on the ceiling you will use for reference with a pencil.
- Since most blades are slanted, be sure to measure the same side of each blade, from the same point on the ceiling.
- If you find one blade that is higher or lower than the rest, gently adjust the blade holder until they all match.
- Check the fan balance: Turn the power back on and turn the fan on. Check if the wobble is fixed.
If the wobbling persists, continue with step 6.
Step 6: Label The Blades
Use painter’s tape to mark each blade arm with a number. This helps you track which blade you are testing as you move the penny around.
- Turn OFF the fan.
- Use painter’s tape to number each blade arm.

Step 7. Open The Balancing Kit
Here is what you’ll find:
- Balancing clip: to test different blade positions.
- Adhesive weights: to permanently correct the imbalance once found.
- Adhesive pads or tape: to secure weights in place.

Step 8. Place The Balancing Clip
- Choose one blade to start with.
- Attach the plastic clip to the top edge of the blade, positioning it as close to the center as possible (lengthwise).

Step 9: Test Each Blade
You may need to test all blades before finding the one that benefits from balancing. To determine the best placement of the weight:
- Turn the fan ON at a low speed and observe any wobbling.
- If the fan still wobbles, turn it OFF and slide the clip one inch down the fan blade toward the end.
- Turn the fan ON and test again.
- Repeat this process, moving the clip in small increments, until you find the unbalanced blade and the wobble stops.

Step 10. Add the weight
Once you’ve found the best position for the clip that minimizes or eliminates the wobble, it’s time to glue the weight.
- Then remove the backing from the adhesive on the ceiling fan weight and attach it to the center of the blade, at the same level as the balancing clip.
- Remove the balancing clip
- Turn the fan on and check if the wobble is fixed.
Your fan should now be balanced. If not, please continue reading below for additional tips and the troubleshooting process.
Troubleshooting: What to do If Wobbling Persists After Trying To Balance A Ceiling Fan With A Balancing Kit Or A Penny
If you’ve already used a balancing kit or tried the penny method and your ceiling fan still wobbles, the issue may go beyond blade weight. In our experience, in Orlando and Central Florida, we’ve found the root cause often lies in the mounting hardware or how the fan was installed.
Try these additional tips before considering a full replacement or calling a professional.
1. Remove & Check the blades
a. Check for Warping or Damage
Carefully remove each blade and inspect for any signs of warping, cracking, or uneven wear. Even slight warping can cause imbalance.
b. Replace Damaged Blades
If any blades are visibly damaged or warped, it’s best to replace them with matching blades from the same manufacturer to ensure balance and symmetry.
2. Check for Loose Connections
Ensure that all screws and bolts connecting the fan blades to the blade arms, and the blade arms to the motor housing, are tight. Use a screwdriver to gently re-tighten them as needed.
Check Mounting Bracket
Look at the ceiling bracket where the fan is mounted. Ensure it’s securely fastened to the electrical box in the ceiling. A loose bracket can amplify wobbling even if the blades are perfectly balanced.
3. Check Downrod and Motor
a. Check the Downrod
If your ceiling fan uses a downrod, inspect it for any bends or misalignment. A bent downrod can throw off the fan’s balance and cause vibration.
b. Check the Motor Housing
Ensure the motor is securely fastened and does not shift when the fan is running. Any movement here can create a wobble even when everything else looks balanced.
4. Ensure Secure Mounting (Visible Exterior Parts)
Check the following:
- Mounting Bracket: Ensure the bracket sits flush against the ceiling and does not shift when gently pressed against it.
- Downrod: If your fan has a downrod, confirm it’s securely seated in the yoke and not loose or damaged.
- Canopy Cover: Make sure the canopy is tight against the ceiling and isn’t wobbling separately from the fan.
5. Check the Ceiling Fan Installation (Behind the Canopy)
If balancing hasn’t resolved the wobble, the issue could stem from improper installation. Remove the ceiling fan canopy and check how it’s mounted. It should be secured to one of the following:
- A fan-rated electrical junction box (not just a light fixture box)
- A ceiling fan support brace
- A solid structure like a 2×4 with lag screws
If it’s not mounted properly, the fan may remain unstable, regardless of how well the blades are balanced. Reinstallation using the correct hardware is essential. Improper mounting isn’t just a performance issue; it’s a safety concern. In many Central Florida homes, our licensed electricians have corrected these exact problems with professional rewiring and secure installation.
6. Replace the Ceiling fan
If your ceiling fan still wobbles after all the troubleshooting, it may be time for a replacement. Older fans can develop permanent issues like:
- Warped or mismatched blades
- Worn motor bearings
- Damaged or unstable mounts
They also lack modern features like self-balancing technology or stronger blade materials.
Signs it’s time to replace your fan
- Cracked motor housing
- Grinding or humming sounds
- Movement at the base or downrod
- Hard-to-find replacement parts
Upgrading to a new energy-efficient fan can boost airflow, reduce noise, and update your space.
Need help balancing your ceiling fan?
Call us today at (407) 646-8700 for a free quote on professional ceiling fan installation or fill out a contact form.
Balancing a Ceiling Fan: DIY Method vs. Hiring a Pro
If you’re experiencing issues with your ceiling fan and wondering whether a DIY fix will do or if it’s time to call a professional, the guide below outlines the pros and cons of each option.
Whether you’re a hands-on homeowner or prefer the assurance of expert support, understanding the difference can help you make the best choice for your comfort, safety, and peace of mind.
DIY Fan Balancing: Pros and Cons
| Pros: | Cons: |
|---|---|
| Cost-effective: Uses simple tools like a penny or an inexpensive balancing kit | Time-consuming: May require trial and error to find the correct balance |
| Convenient: Can be done on your own schedule | Potential for errors: Incorrect installation or misalignment can worsen the wobble |
| Safety risk: Risk of falling or damaging components if tools are misused |
Hiring a Pro Fan Balancing: Pros and Cons
| Pros: | Cons: |
|---|---|
| Expertise and experience: Professionals quickly identify and fix the root cause | More expensive: Labor and service fees increase the total cost |
| Time-saving: The job is done efficiently with minimal disruption | Scheduling required: May take time to book an appointment with a qualified technician |
| Warranty protection: May be required to maintain product warranties | |
| Code compliance: Ensures electrical and mounting components meet safety codes |
When to hire a Professional Electrician to balance a ceiling fan?
You should hire a professional electrician if your fan has:
- Severe wobbling: If the fan continues to shake after balancing, the issue may be structural or due to poor installation.
- Unusual noises: Clicking, buzzing, or grinding sounds often point to motor problems or loose parts.
- Safety concerns: Signs like exposed wires, a wobbly mount, or an unstable fan should never be ignored.
- Complex issues: A faulty motor, warped downrod, or inadequate ceiling support may be to blame, and require professional repair.
Ceiling Fan Balancing Methods: Pros and Cons
If you’re trying to decide whether to use a balancing kit or go the DIY route with household items like pennies, the list below outlines the pros and cons of both methods.
Both approaches can be effective, but each has its own advantages and limitations. Continue reading to determine which option best fits your needs, skill level, and comfort level.
Pros and cons of balancing a ceiling fan without a balancing kit (Using a Penny)
| Pros: | Cons: |
|---|---|
| Cost-effective: You can use items like pennies or dimes that you already have at home. | Less precise: Homemade fixes may not fully eliminate the wobble. |
| Simple process: Just trial and error. No special tools or parts are required. | Potential for damage: Incorrect placement of weights or using the wrong materials can harm the blades. |
| Convenient: No waiting for shipping or driving to the store to get a kit. | Time-consuming: Requires more time due to repeated testing and adjustments. |
Pros and cons of balancing a ceiling fan with a balancing kit
| Pros: | Cons: |
|---|---|
| Accurate balancing: Kits are designed to identify the exact imbalance point. | Cost: Although kits are affordable (prices range between $4 and $6), they still require an additional purchase. |
| Designed for the task: Includes specialized weights and clips tailored for fan blades. | Wait time or pickup: You may need to order it online or visit a store. |
| Faster results: Speeds up the balancing process with fewer trials. | May not work on all fans: Some kits might not be compatible with older or custom models. |
How to balance a Ceiling Fan FAQ’s
If you don’t have a ceiling fan balancing kit, you balance a ceiling fan with a penny by following all the previous steps, but use the penny to simulate the balancing clip and weights. Instead of sliding the clip along the blade, tape the penny to various points on the fan blades. When you find the point that works to balance the fan, mark the spot and tape the penny to the center of the blade. A penny might not weigh enough, in which case you can repeat the entire process with a heavier coin like a quarter. Or you can buy a fan balancing kit such as this one at Ace Hardware for $2.99.
Nationally, the cost to have a professional balance a ceiling fan is between $90 – $150. If you choose to balance the fan yourself, check to see if you still have the balancing kit that likely came with the original ceiling fan. If not, ceiling fan balancing kits start as low as $2 or $3 at Ace Hardware or any other local hardware store.
A wobbly ceiling fan can fall off if 1) the screws attaching the fan to the junction box are not firmly attached or if 2) the ceiling fan was improperly installed in an electrical junction box designed for a light fixture instead of a fan. The weight of the fan plus the torsion during use can cause the fan to break free from the ceiling. Additionally, a wobbly ceiling fan can cause a light fixture to fall off and come crashing down, potentially causing injury.
A wobble of up to ⅛ inch is normal. This amount of wobble is almost unnoticeable. A ceiling fan is not supposed to shake noticeably. If your fan is visibly shaking, making thumping or clicking noises, or if the motor is buzzing or squeaking, you should balance the fan or have a licensed electrician come to review and correct the installation.
A wobbling ceiling fan is usually caused by uneven weight distribution among the fan blades. This can happen if one or more blades are warped, dirty, loose, or misaligned. Other common causes include a loose mounting bracket, an unlevel ceiling box, or poor installation. Even slight differences in blade angle or weight can cause a noticeable wobble when the fan is spinning at higher speeds.
Ceiling fans can go out of balance over time due to normal wear and tear. Dust buildup on one or more blades, blade warping due to humidity or heat, or accidental bumps during cleaning or maintenance can all alter the fan’s balance. In some cases, improper installation, such as mounting the fan to a standard electrical box instead of a fan-rated box, can contribute to long-term instability.
An unbalanced ceiling fan may produce a variety of unusual sounds. These can include clicking, rattling, humming, or a repetitive thumping noise as the blades wobble. The sound often intensifies at higher speeds. If left unaddressed, an unbalanced fan can strain the motor and lead to louder mechanical noises over time.
Professional Ceiling Fan installation in Orlando & Central Florida
Our team of licensed electricians at Palmer Electric are happy to repair your wobbly ceiling fan. If your ceiling fan is already damaged or looking rough from age and wear, save yourself repeated hassle and money by installing a new ceiling fan. Professional ceiling fan installation gives you peace of mind that the ceiling fan above your head is firmly and correctly attached to the ceiling and will stay that way long-term. Call us today at (407) 646-8700 for a free quote on professional ceiling fan installation or contact us online.